Welcome to Visita247
Digital PIN-based visitor management built for South African and SADC properties. No paper logs. No phone calls to the gate. Just simple, secure access.
How It Works
Resident Creates Invite
Resident opens the mobile app, enters visitor details, and generates a unique 6-digit PIN.
Resident Shares PIN
PIN is shared with the guest via WhatsApp, SMS or any messaging app. No app download needed for the visitor.
Security Validates
Guest gives the PIN at the gate. Security verifies instantly, captures optional vehicle details, and checks the visitor in.
Choose Your Role
Resident
Invite guests, generate PINs, track arrivals and manage your linked properties from the mobile app.
Property Admin
Register properties, add residents and security personnel, view real-time analytics and manage your portfolio.
Security Personnel
Fast PIN verification at the gate, check visitors in/out, view expected guests and manage on-site visitors.
Resident Mobile App
Invite guests in seconds, share digital PINs, and track visitor status in real time.
1. Create an Account
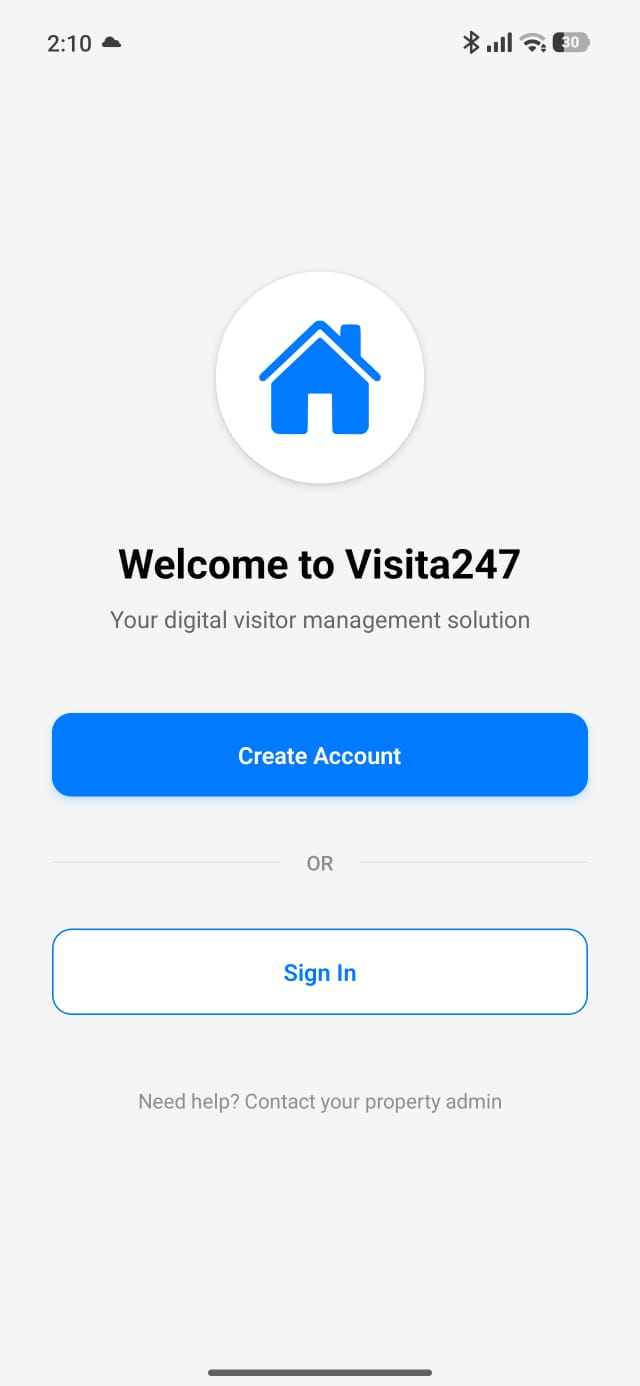
Open the Visita247 Resident app. You will see two options:
- Create Account – for new users
- Sign In – if you already have an account
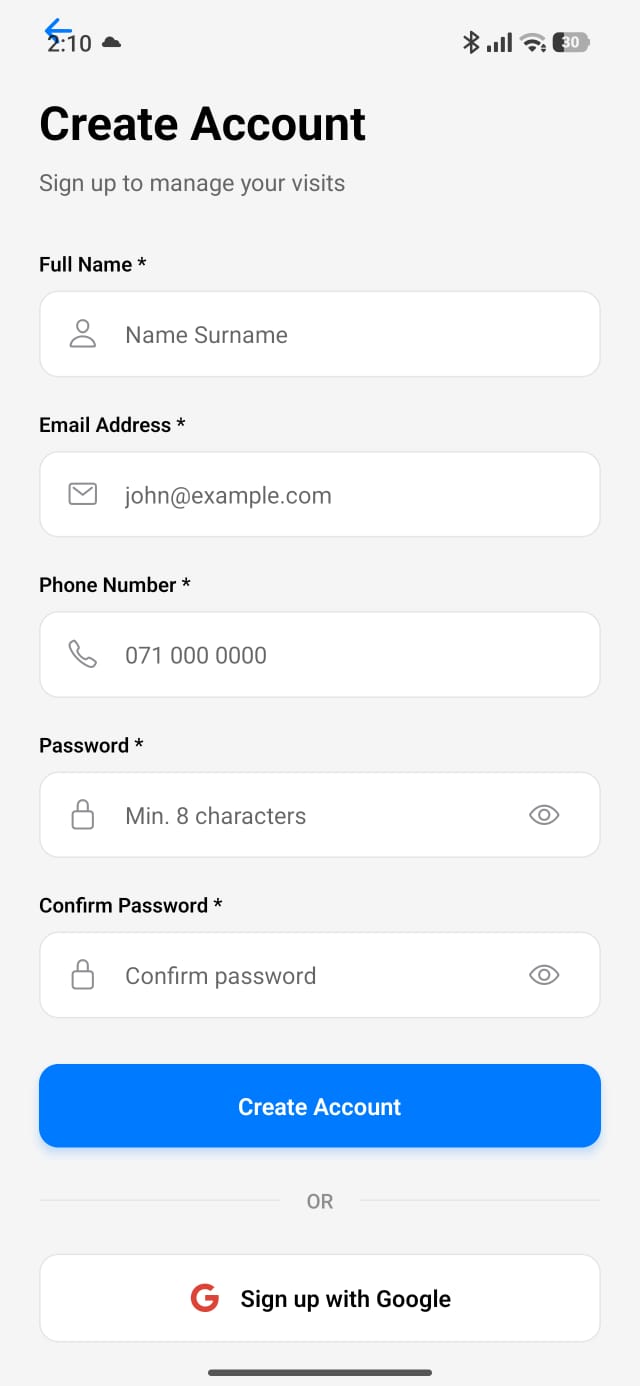
Fill in the required fields:
- Full Name
- Email Address
- Phone Number
- Password (minimum 8 characters)
- Confirm Password
You can also sign up with Google for faster registration.
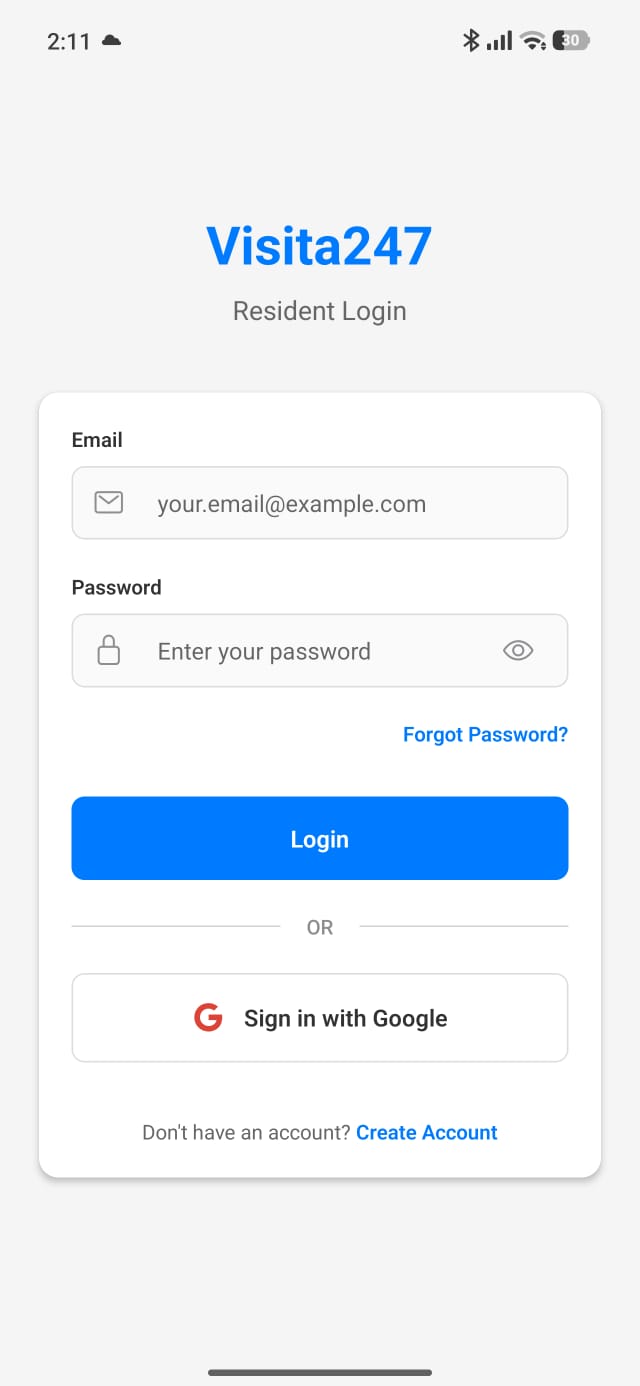
After registration (or if you already have an account), sign in with your email and password, or use Google Sign-In.
2. Link Your Property
After logging in for the first time you will see the “No Linked Properties” screen.
Contact your Property Admin and ask for your personal Invitation Code (example format: AB12CD34 or ENJS4S6Q).
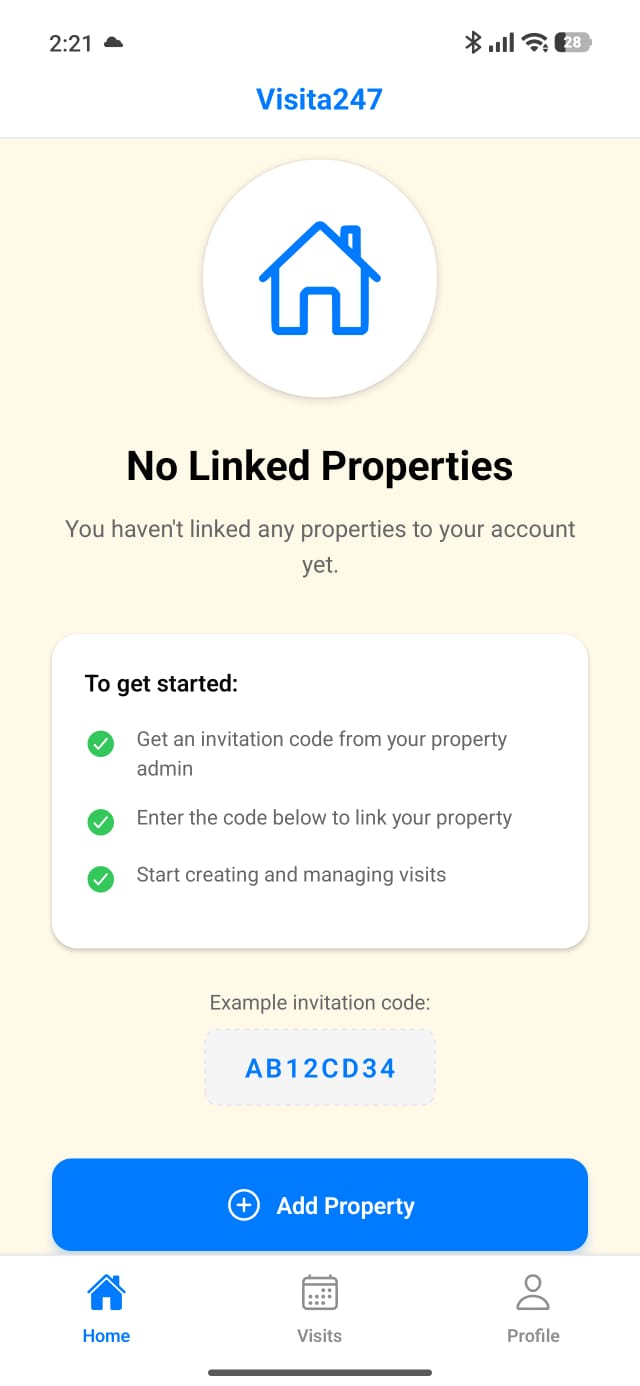
Tap + Add Property, enter the invitation code, and confirm. Once linked, you will see your property name and unit on the Home screen.
3. Create a Visit & Generate a PIN
Once a property is linked, the Home screen shows:
- Your current property and unit
- Create New Visit button
- Today’s Visits list with status and PIN
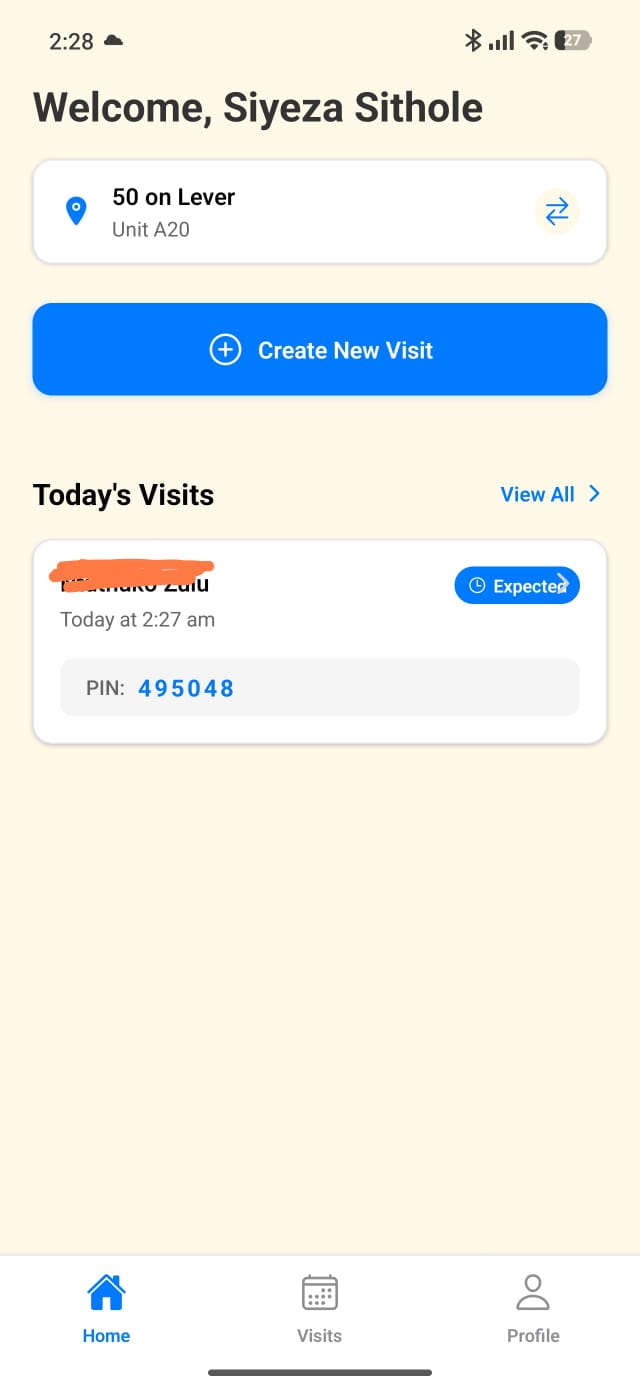
Tap + Create New Visit and enter the visitor’s details (name and phone number). A unique 6-digit PIN is generated automatically.
Share the PIN with your guest via WhatsApp, SMS or any method you prefer.
4. Track Visitor Status
Visits appear on the Home screen with clear status badges:
- Expected – PIN has been created, visitor has not yet arrived
- Checked In – Visitor has been verified at the gate
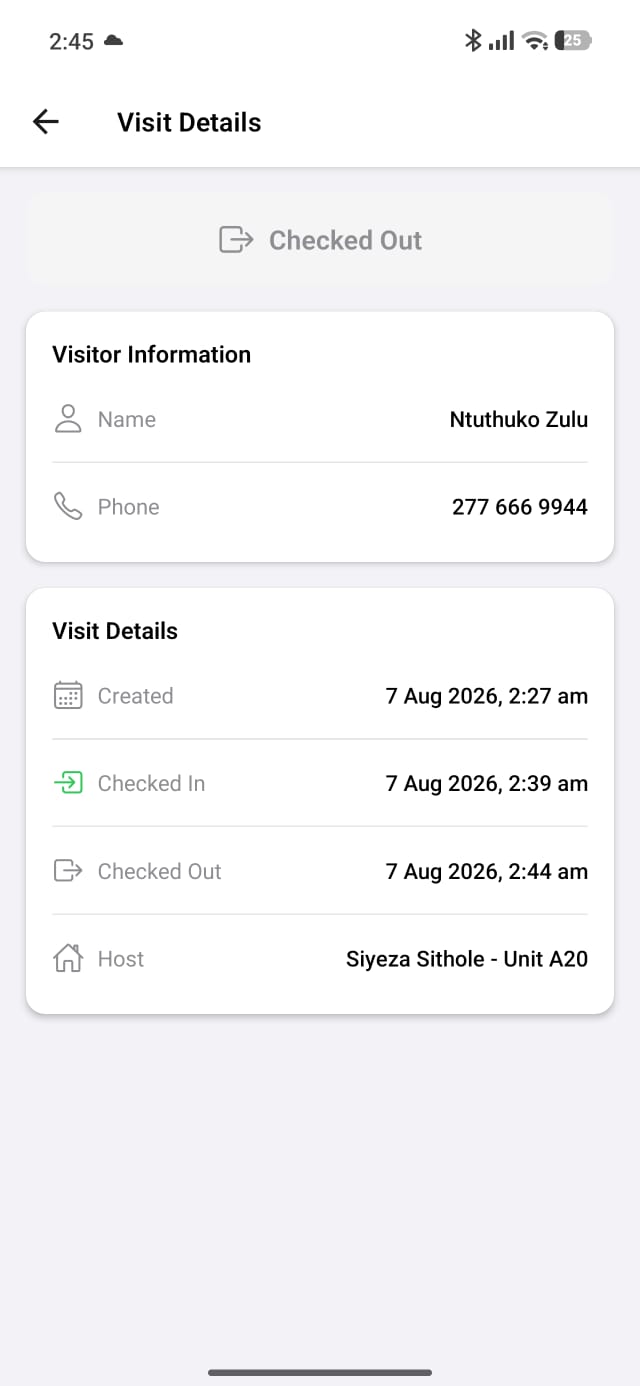
- Checked Out – Visitor has left the property
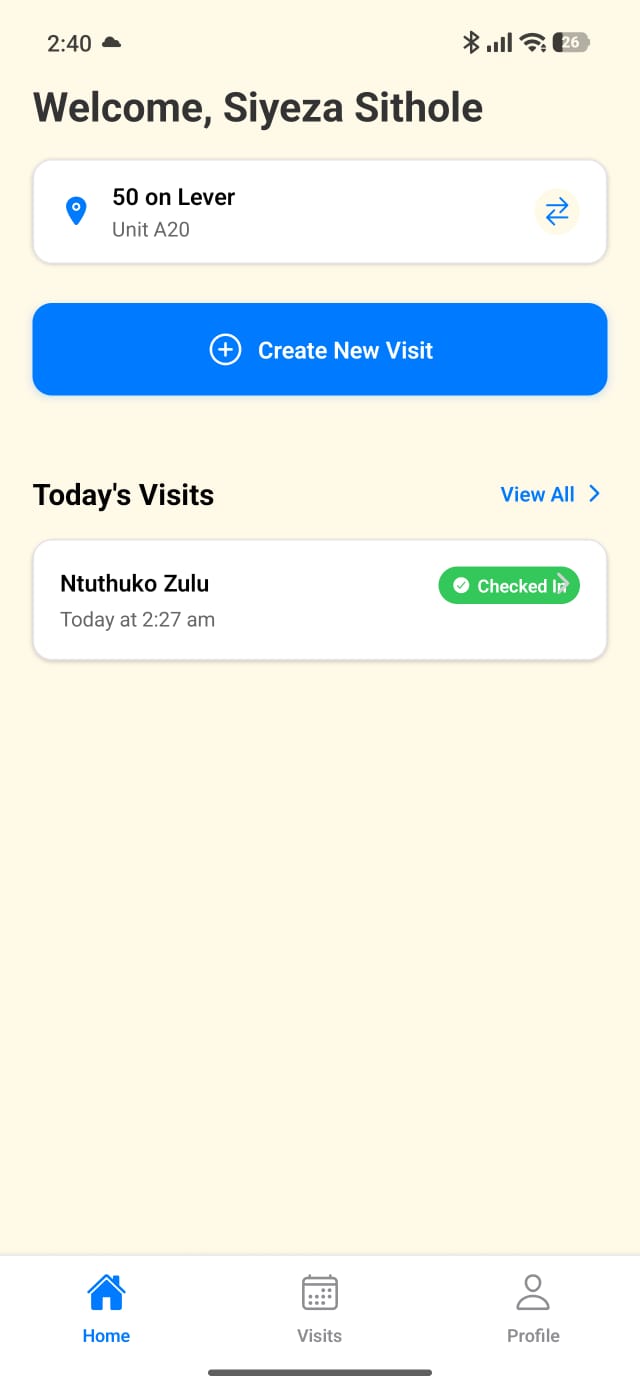
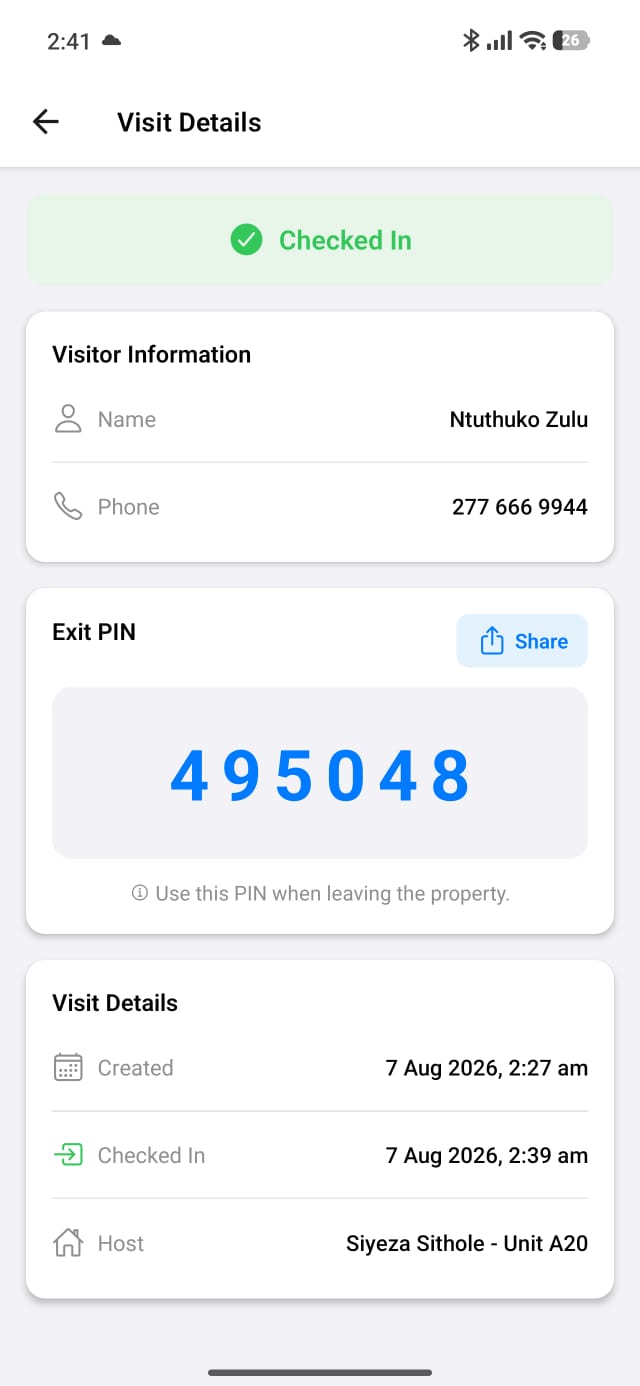
Tap any visit to see full details, including:
- Visitor name and phone
- The Exit PIN (can be shared again if needed)
- Created, Checked-In and Checked-Out timestamps
- Host details
5. Profile
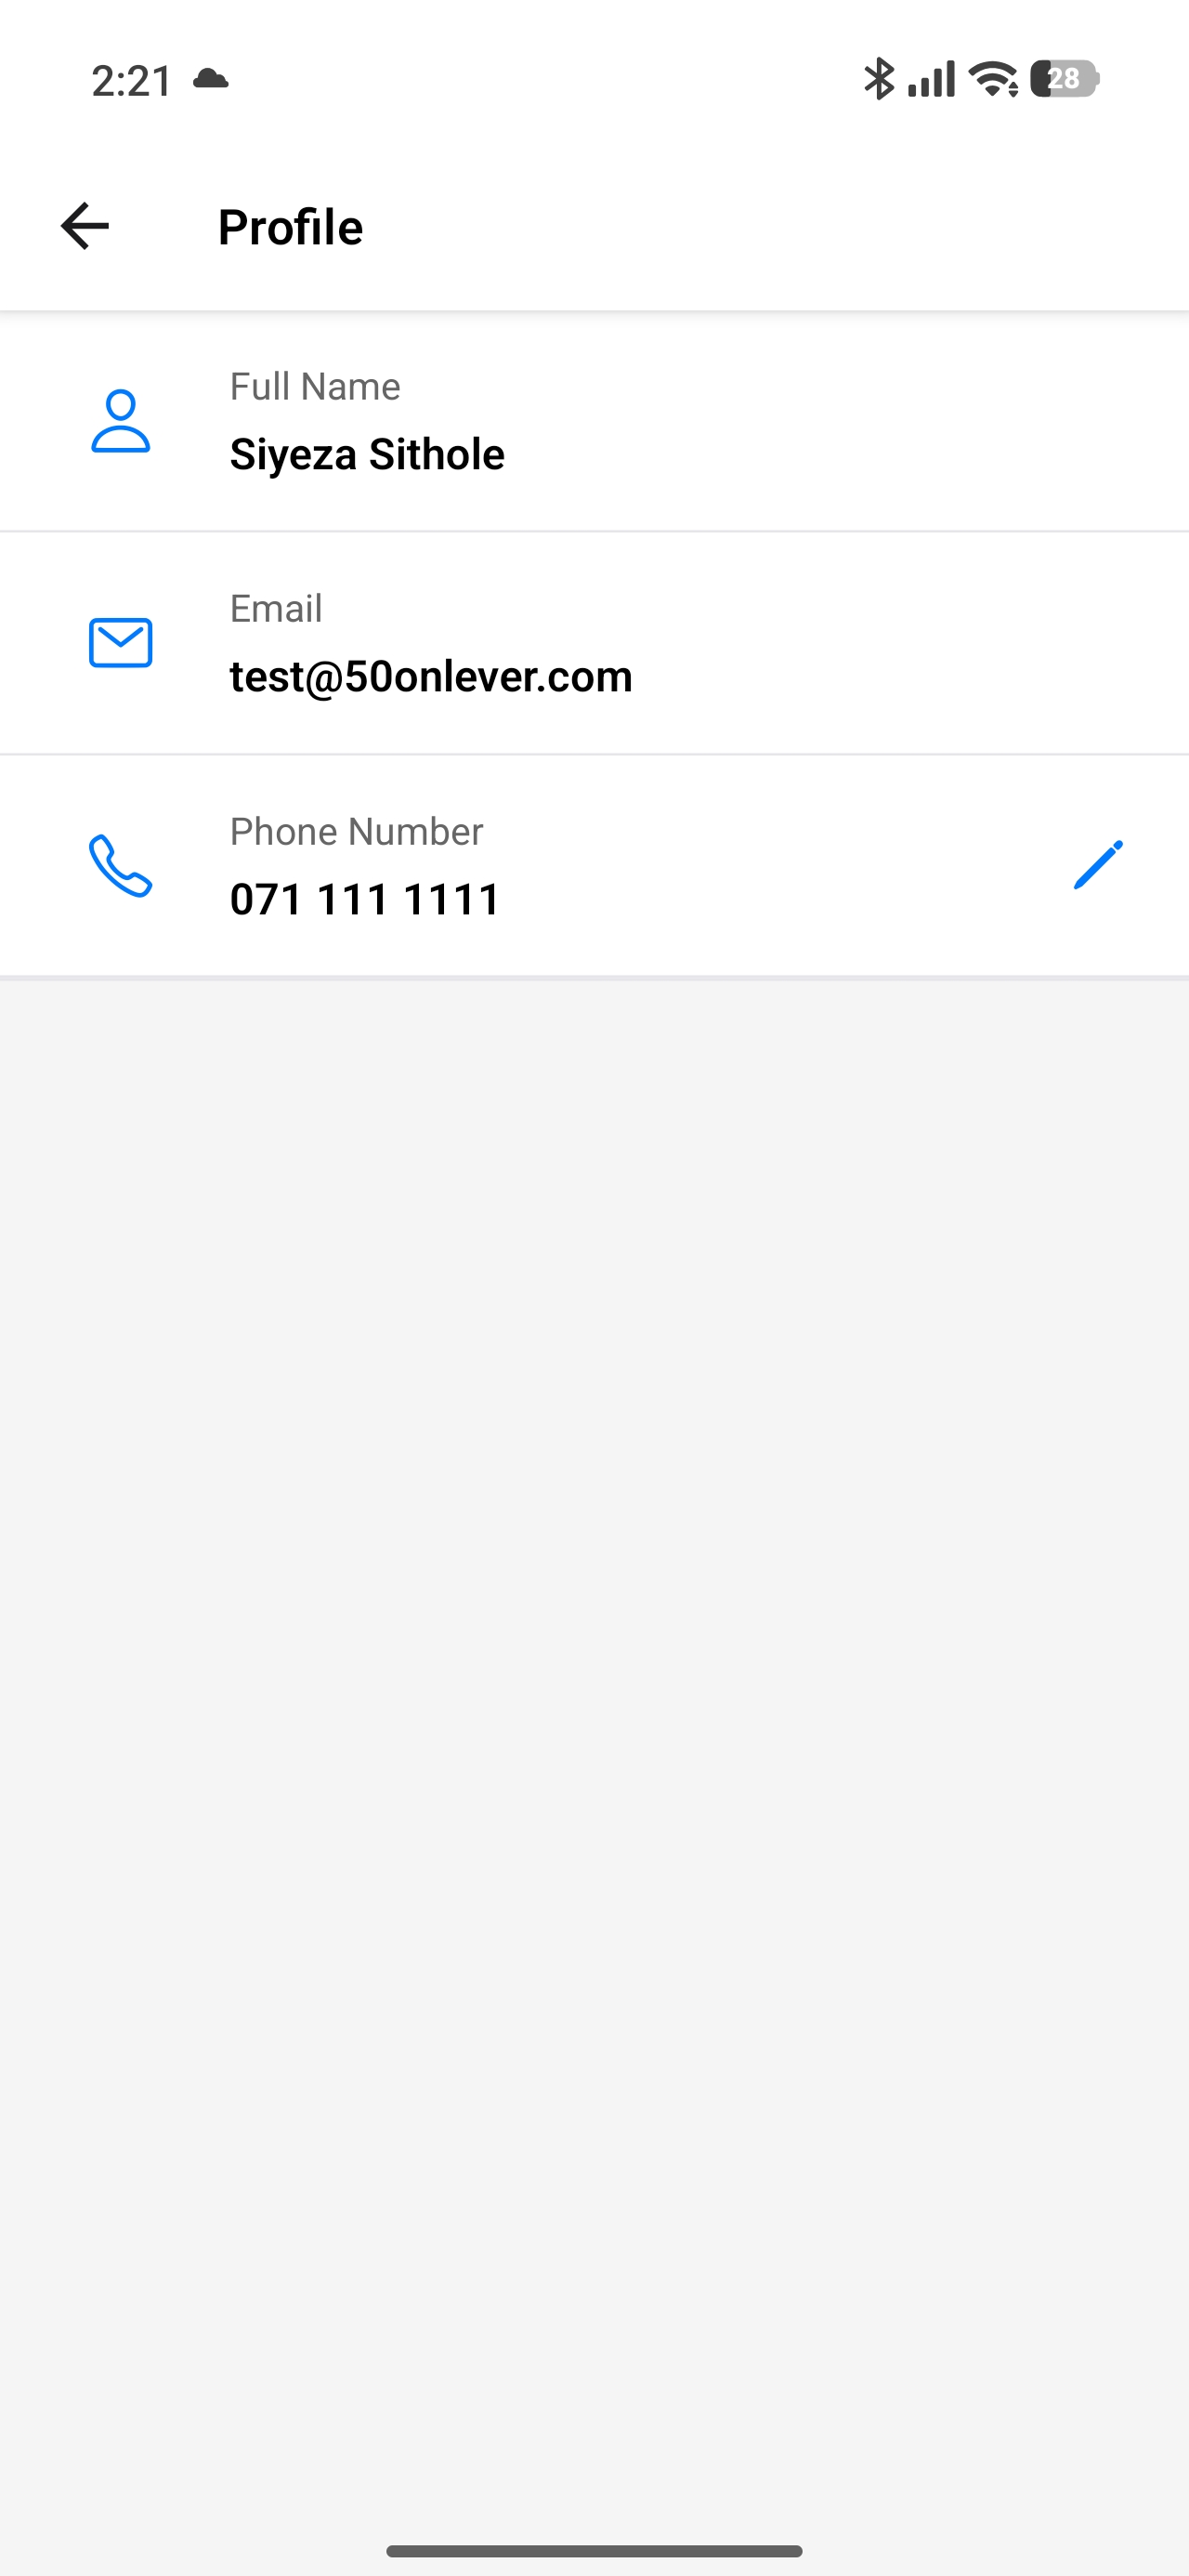
Go to the Profile tab to view your full name, email and phone number. You can update your phone number if needed.
Property Admin Dashboard
Register properties, manage residents and security personnel, and monitor all visitor activity from one place.
1. Create Admin Account & Sign In
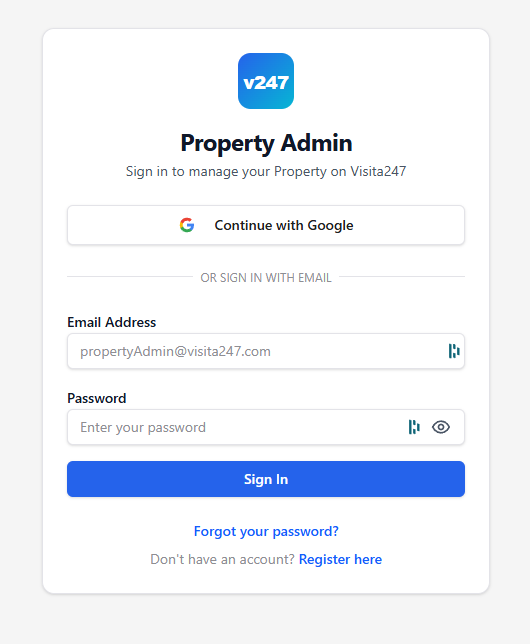
Go to the Property Admin portal. You can:
- Continue with Google
- Sign in with email and password
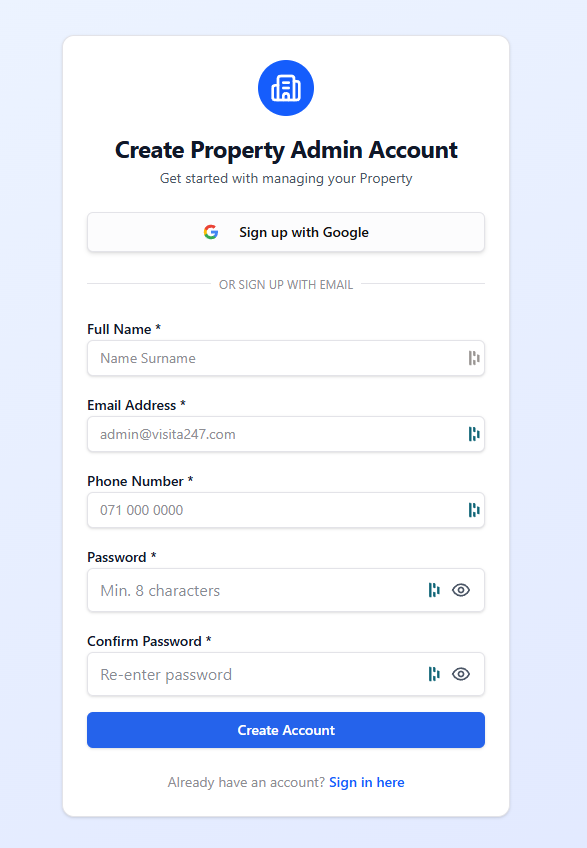
- Register a new account if you don’t have one yet
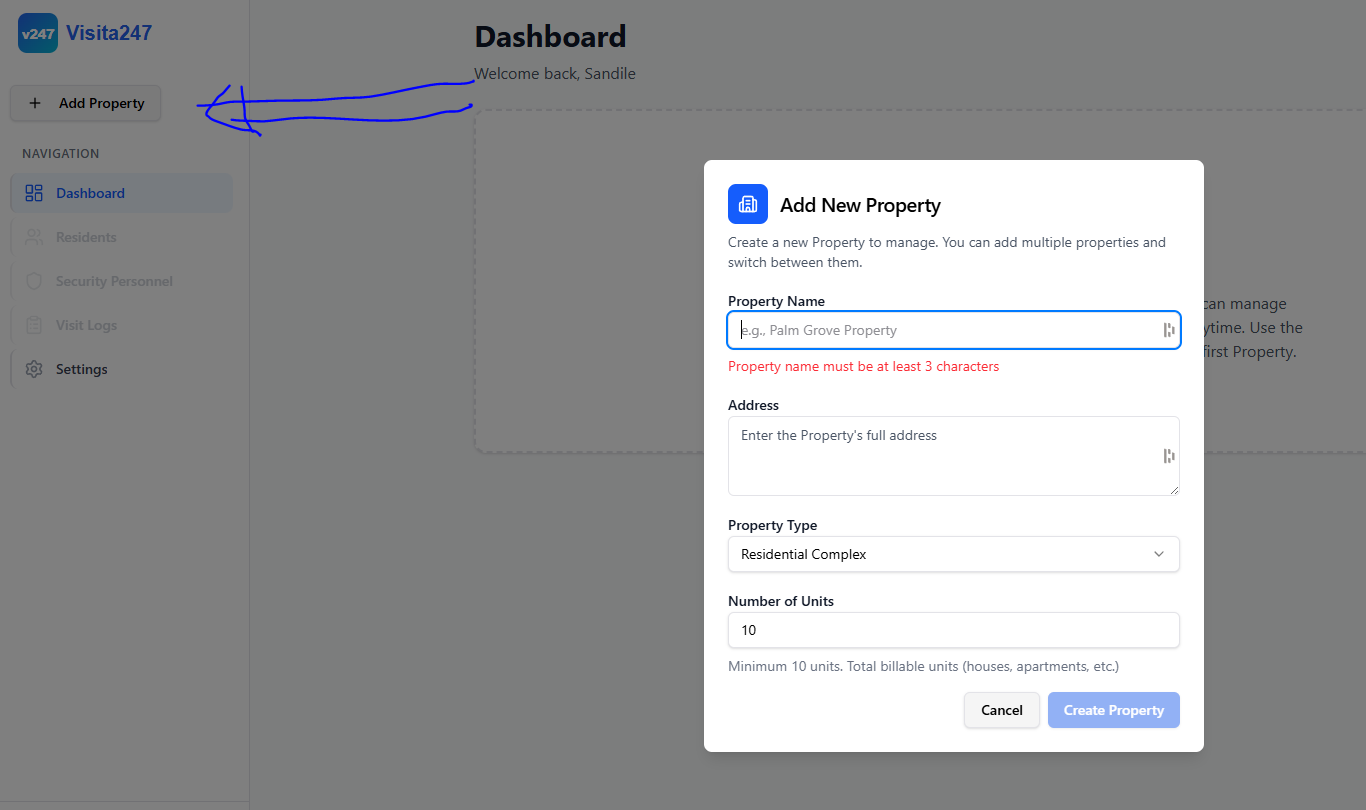
2. Add a Property
After first login you will see the Dashboard with a message that no property is selected.
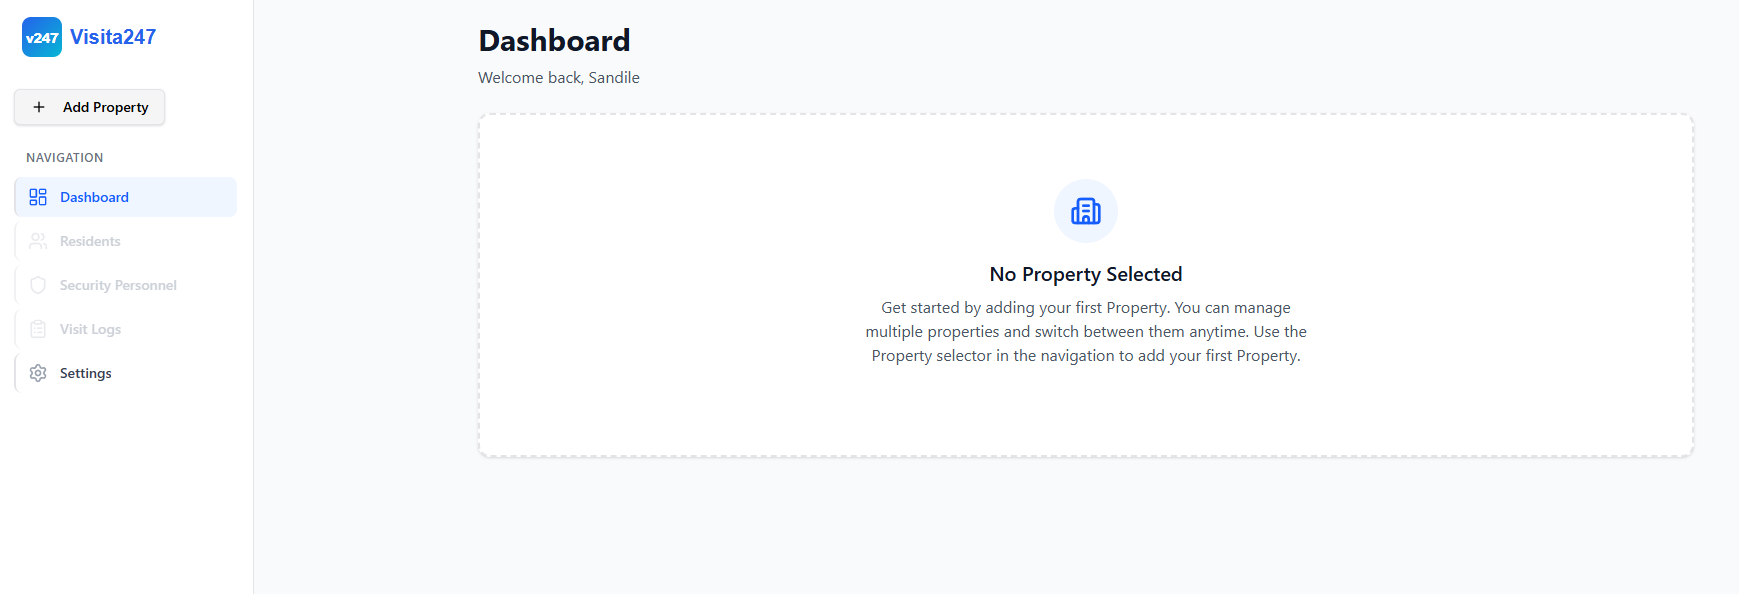
Click + Add Property and complete the form:
- Property Name (minimum 3 characters)
- Full Address
- Property Type (e.g. Residential Complex)
- Number of Units (minimum 10)
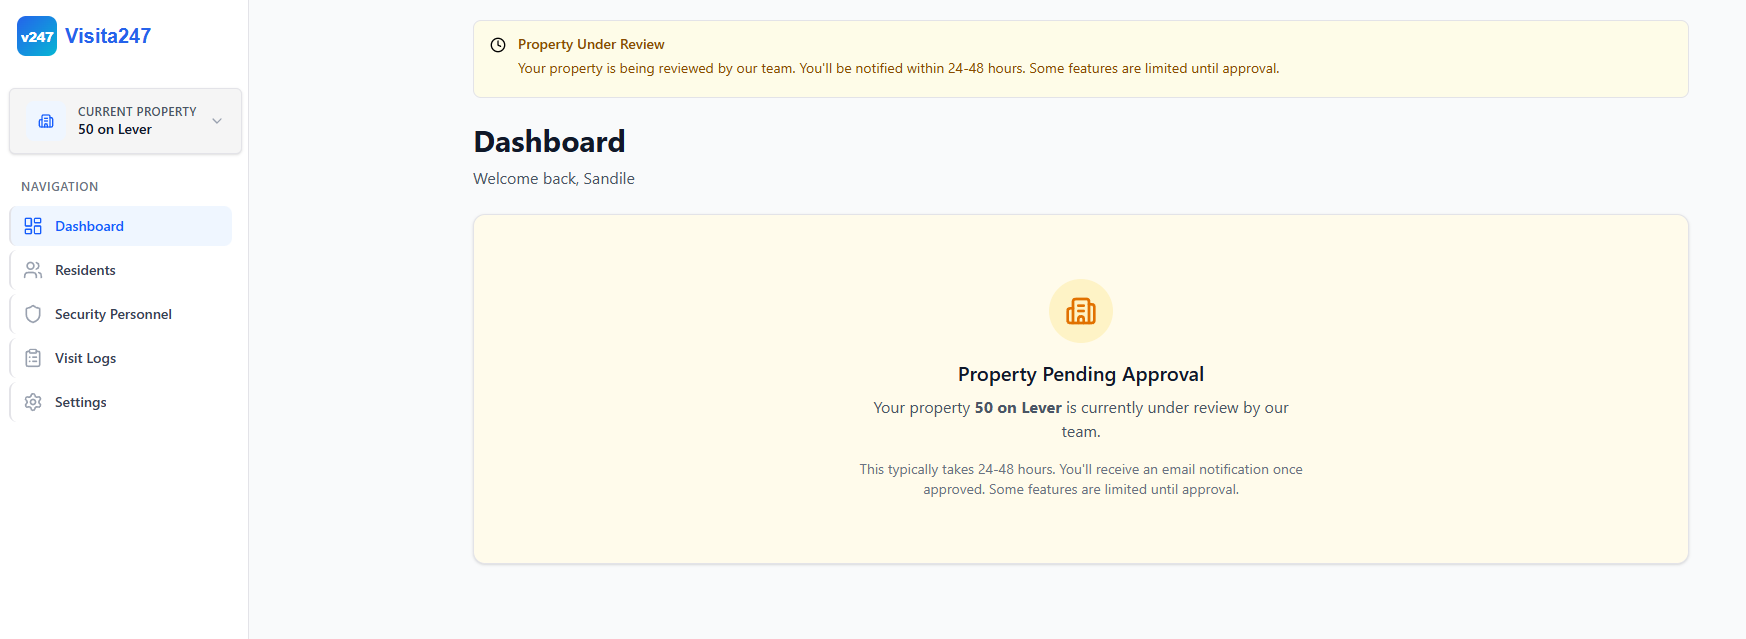
New properties go through a short review (typically 24–48 hours). During this time some features are limited.
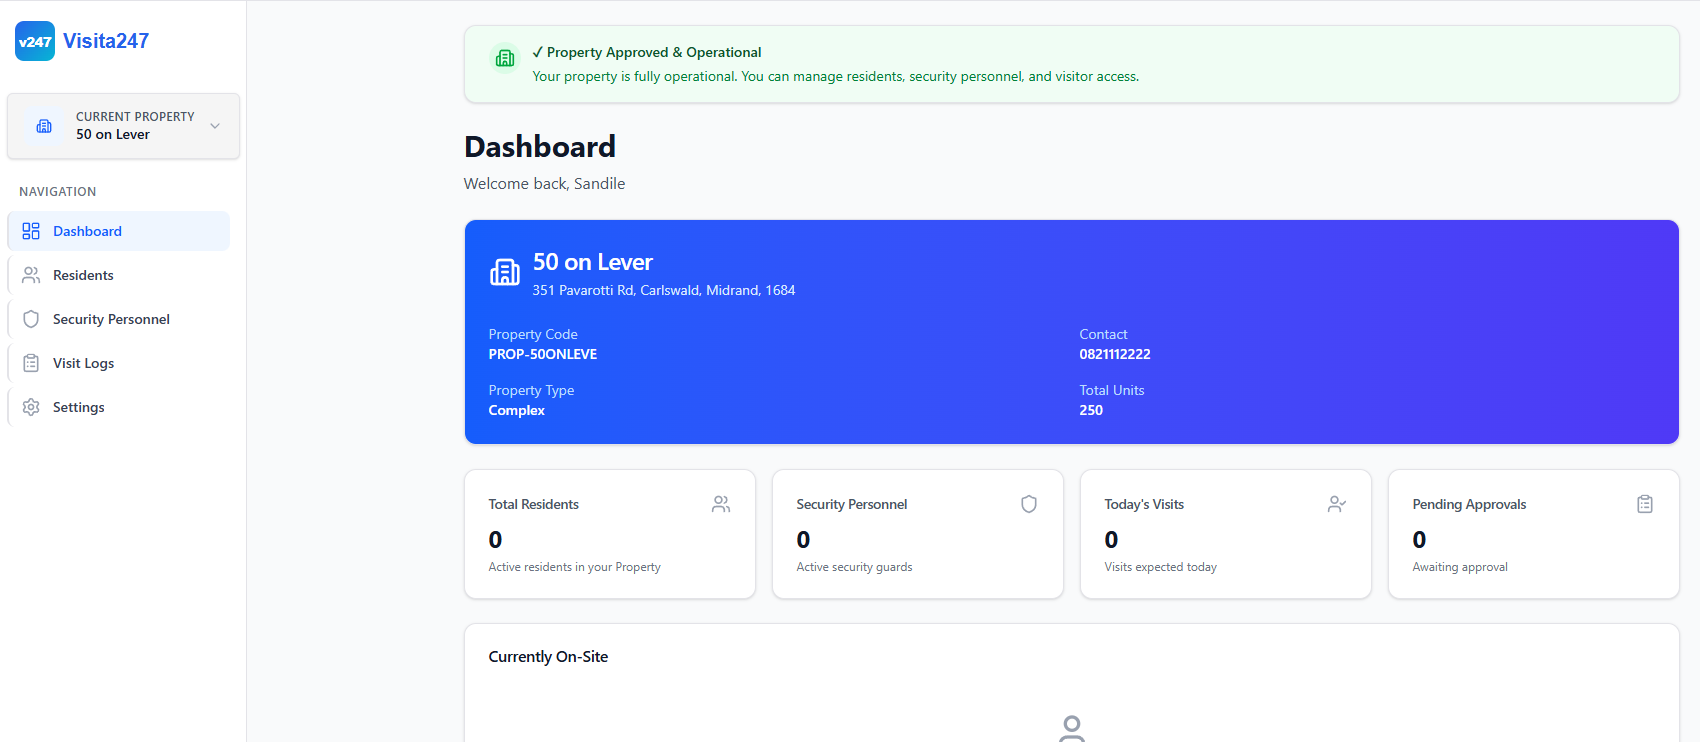
Once approved, the dashboard becomes fully operational.
3. Add Residents
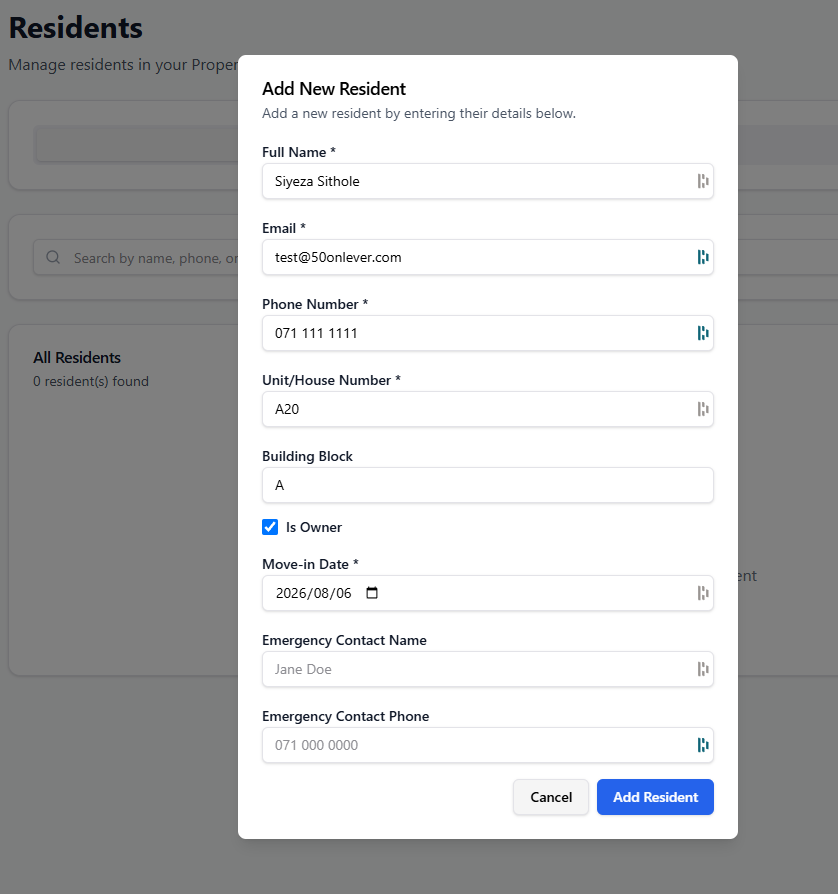
Go to Residents in the side navigation and click Add Resident. Fill in:
- Full Name, Email, Phone Number
- Unit / House Number and Building Block
- Is Owner checkbox
- Move-in Date
- Optional Emergency Contact details
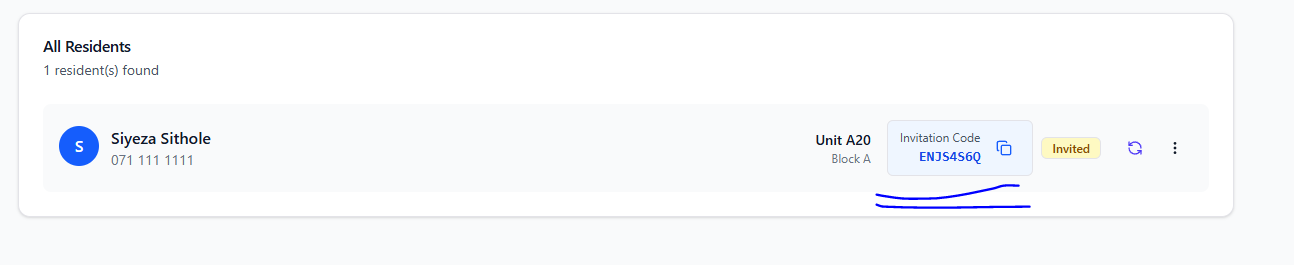
After adding a resident, an Invitation Code is generated (e.g. ENJS4S6Q). Share this code with the resident so they can link the property in their mobile app.
4. Manage Security Personnel
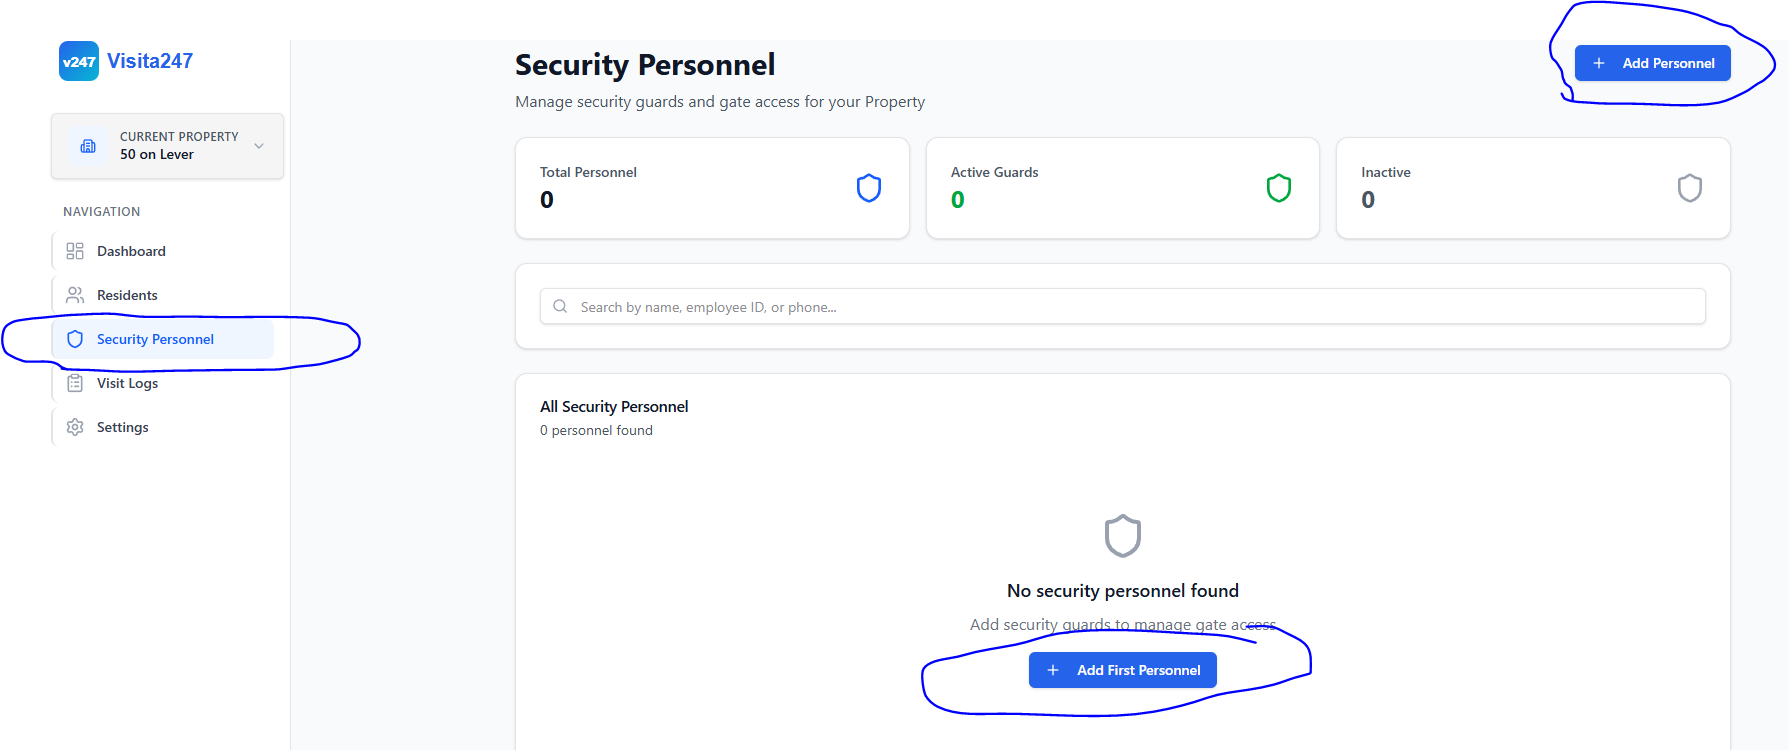
Go to Security Personnel and click + Add Personnel (or Add First Personnel).
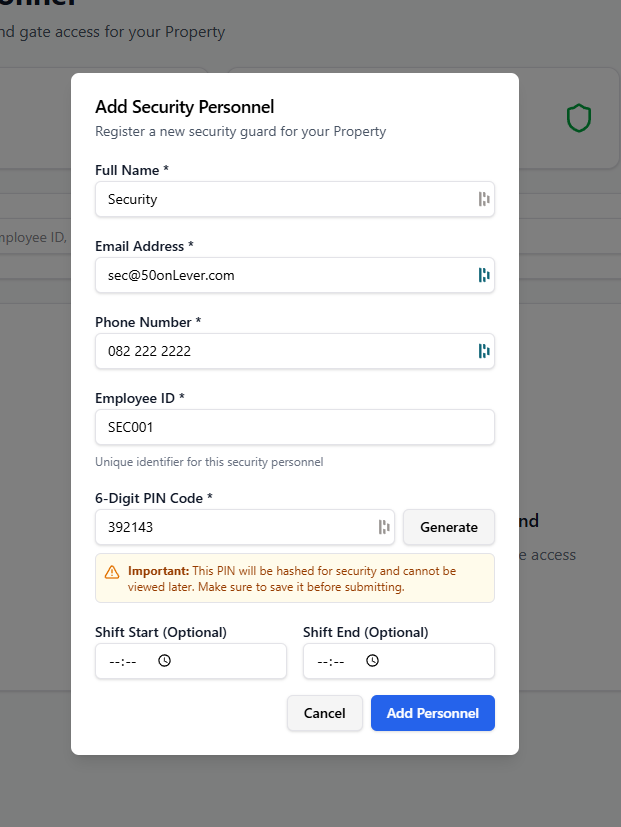
Complete the form:
- Full Name, Email, Phone Number
- Employee ID (unique identifier)
- 6-Digit PIN Code (click Generate or enter your own)
- Optional Shift Start / End times
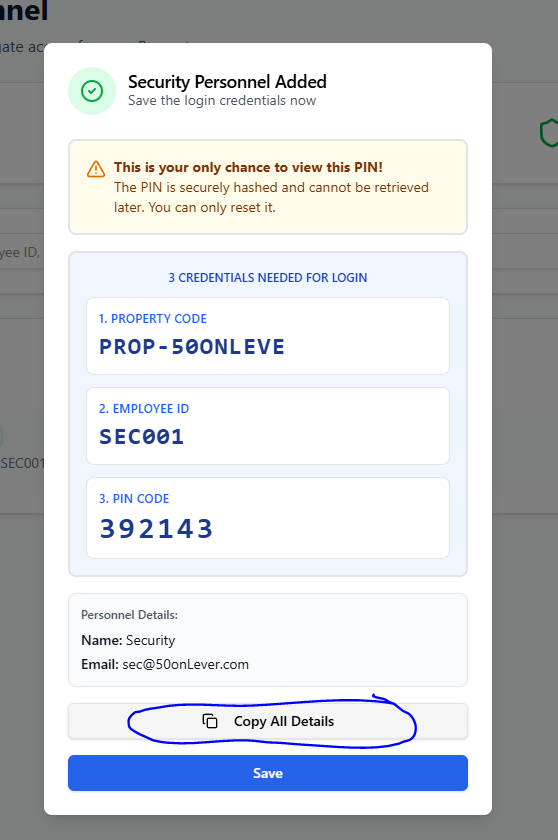
After adding, you will see a confirmation screen with the three credentials the security person needs:
- Property Code (e.g. PROP-50ONLEVE)
- Employee ID
- PIN Code
Use the Copy All Details button and share securely with the guard.
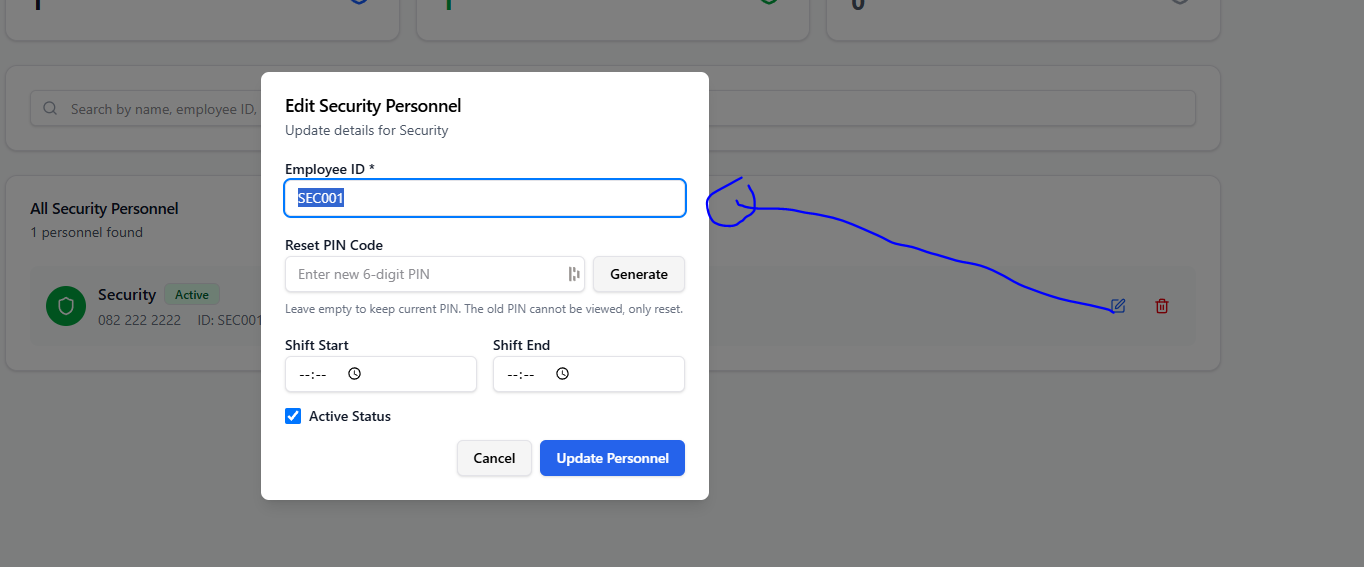
You can later edit a security person to update details or reset their PIN (generate a new one). The old PIN cannot be recovered – only reset.
5. Dashboard Overview
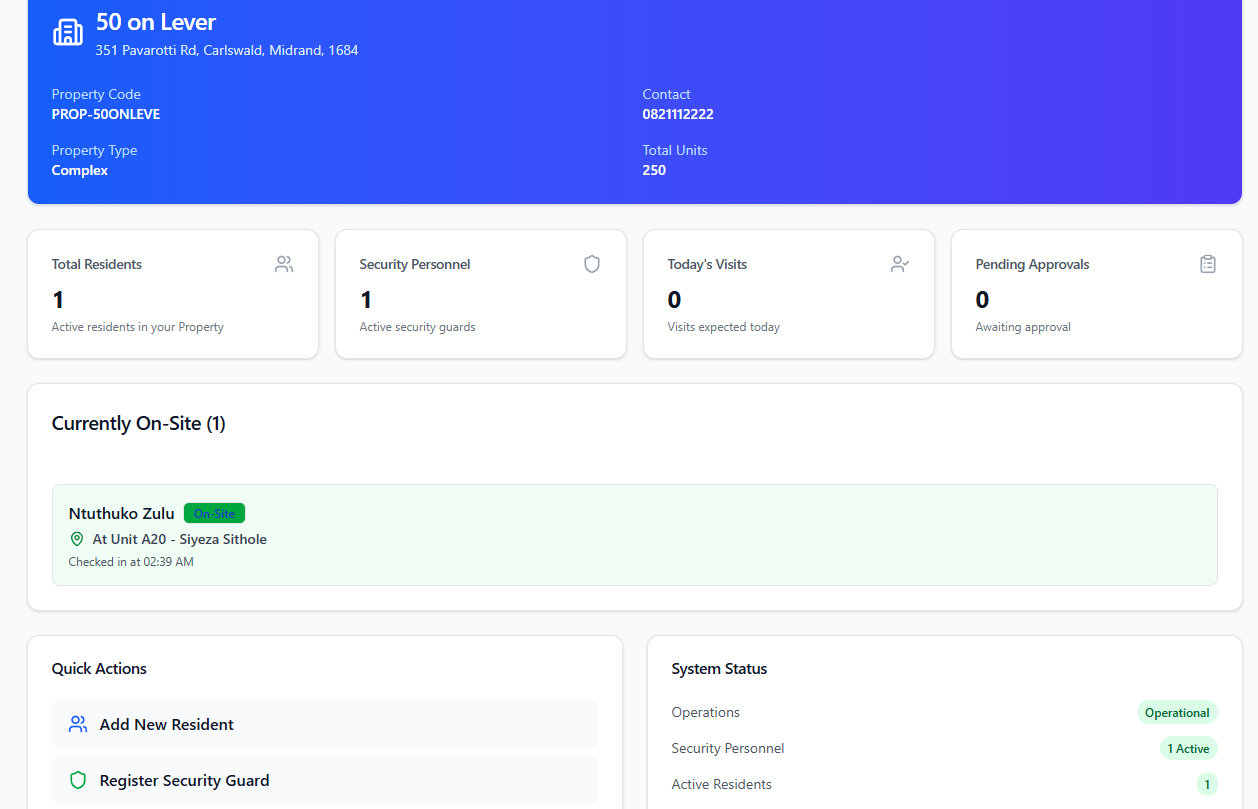
The main Dashboard shows:
- Property details and Property Code
- Total Residents, Security Personnel, Today’s Visits, Pending Approvals
- Currently On-Site visitors
- Quick Actions (Add Resident, Register Security Guard)
- System Status
Security Gate App
Fast PIN verification, check-in/check-out, and clear view of expected and on-site visitors.
1. Sign In
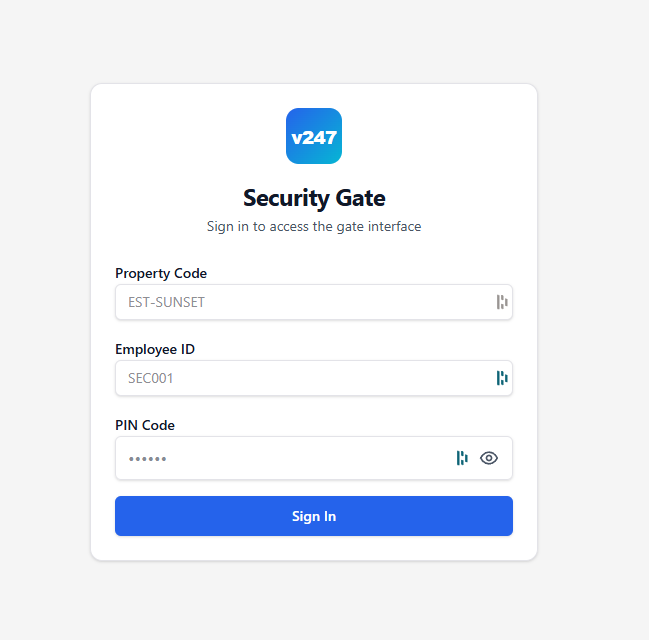
Open the Security Gate interface and enter the three credentials provided by the Property Admin:
- Property Code
- Employee ID
- PIN Code
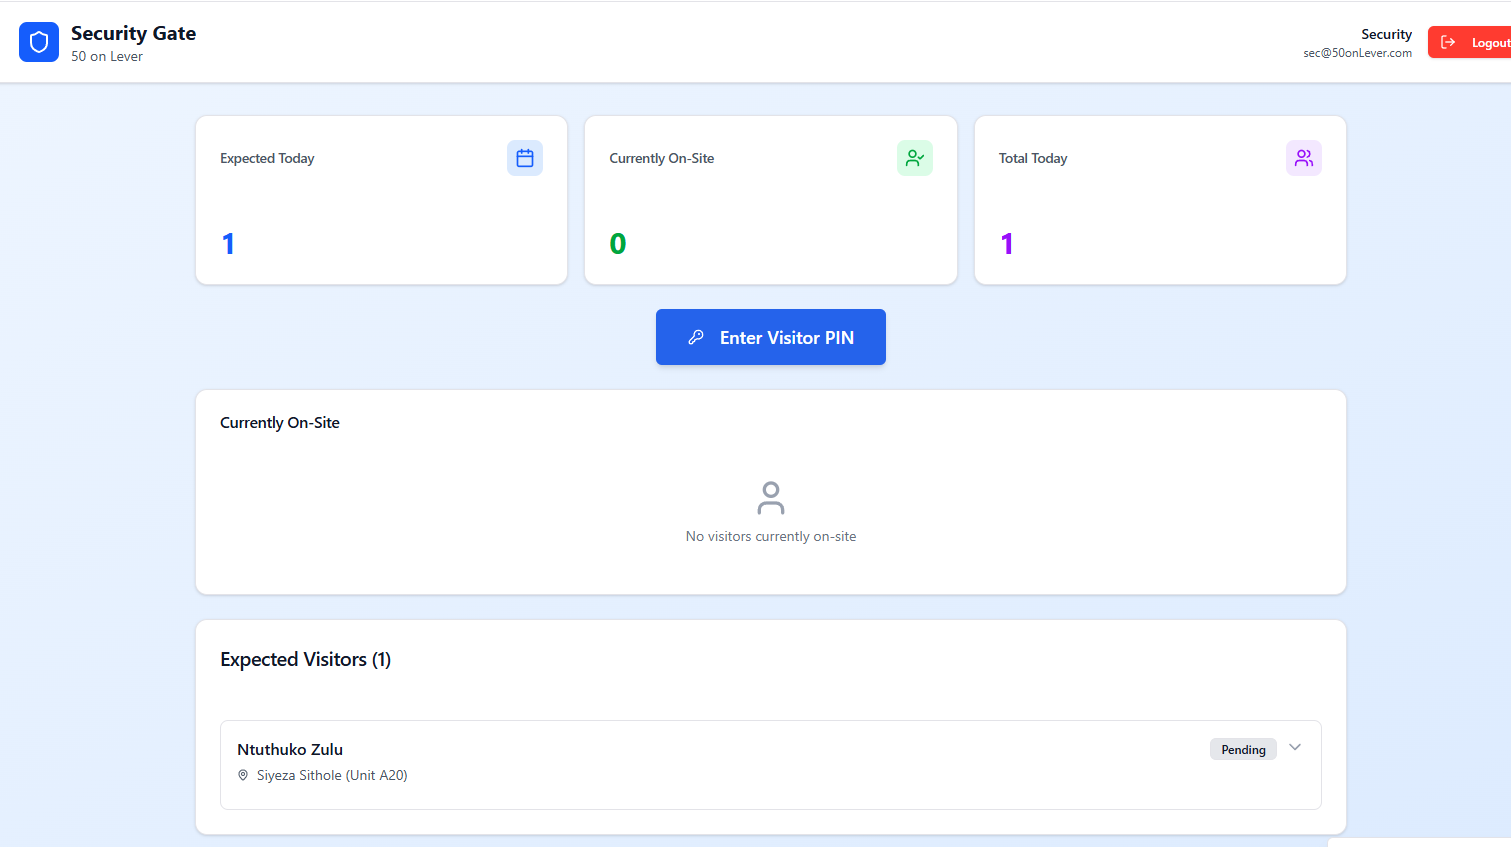
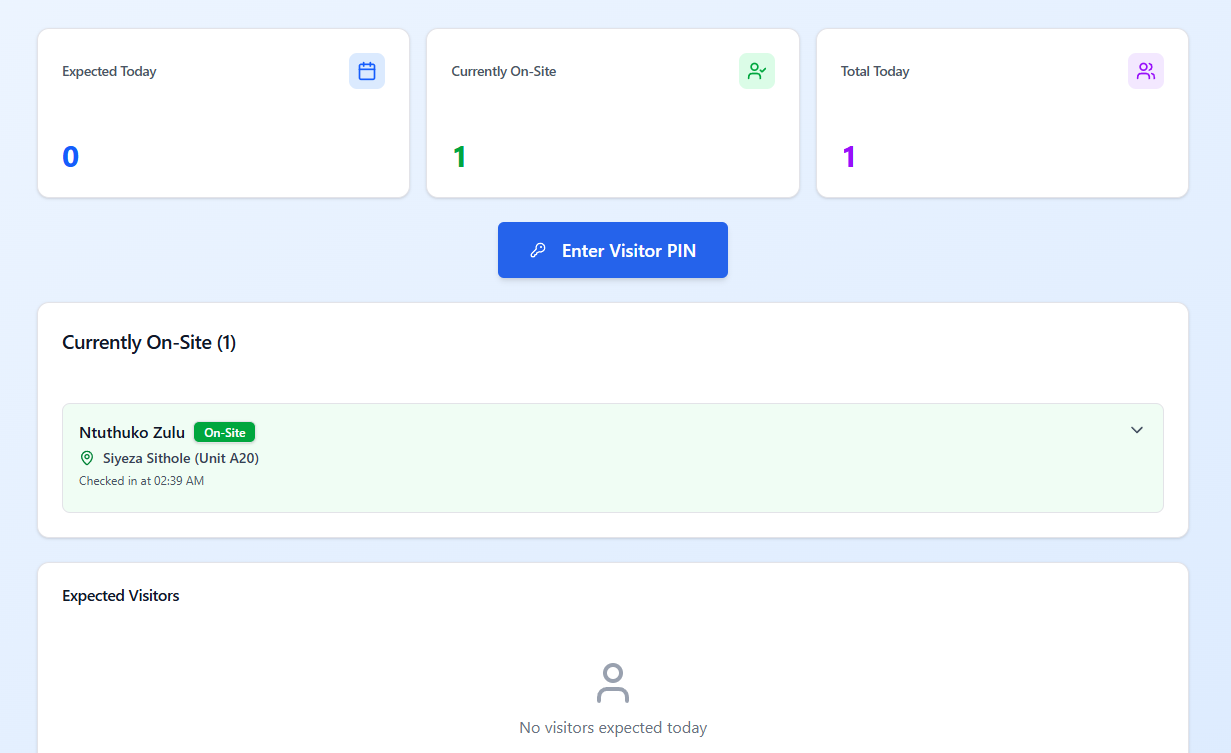
2. Main Dashboard
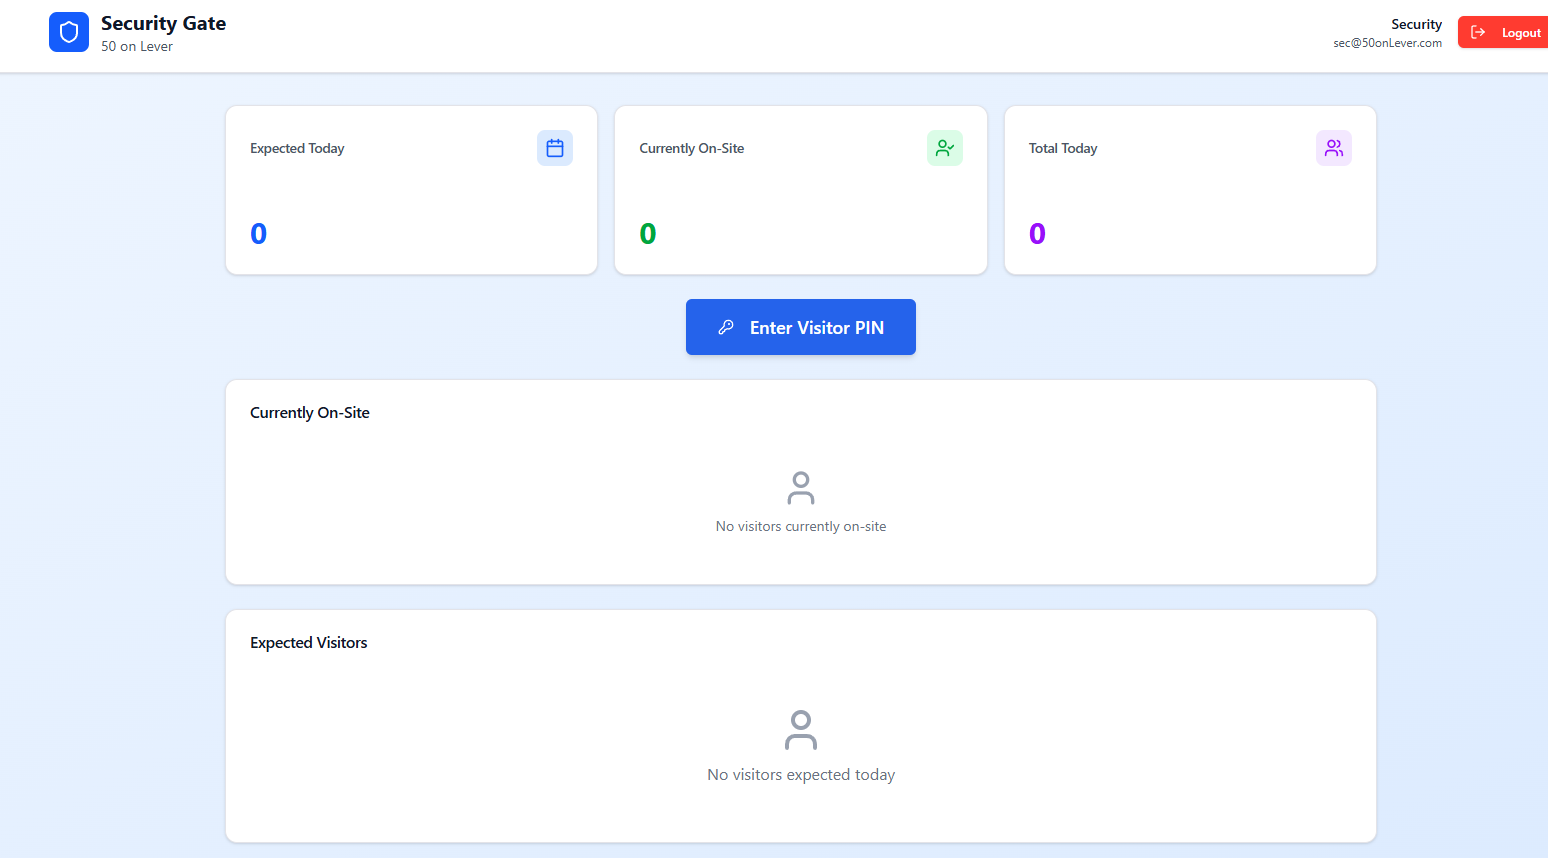
After login you see:
- Expected Today / Currently On-Site / Total Today counters
- Large Enter Visitor PIN button
- Currently On-Site list
- Expected Visitors list
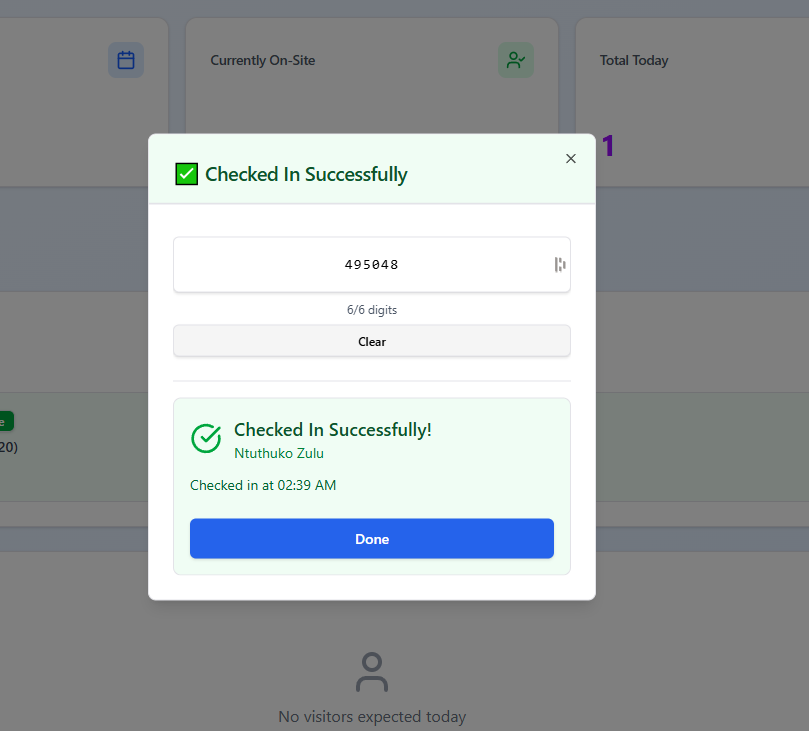
3. Check-In a Visitor
Click Enter Visitor PIN and type the 6-digit PIN given by the visitor.
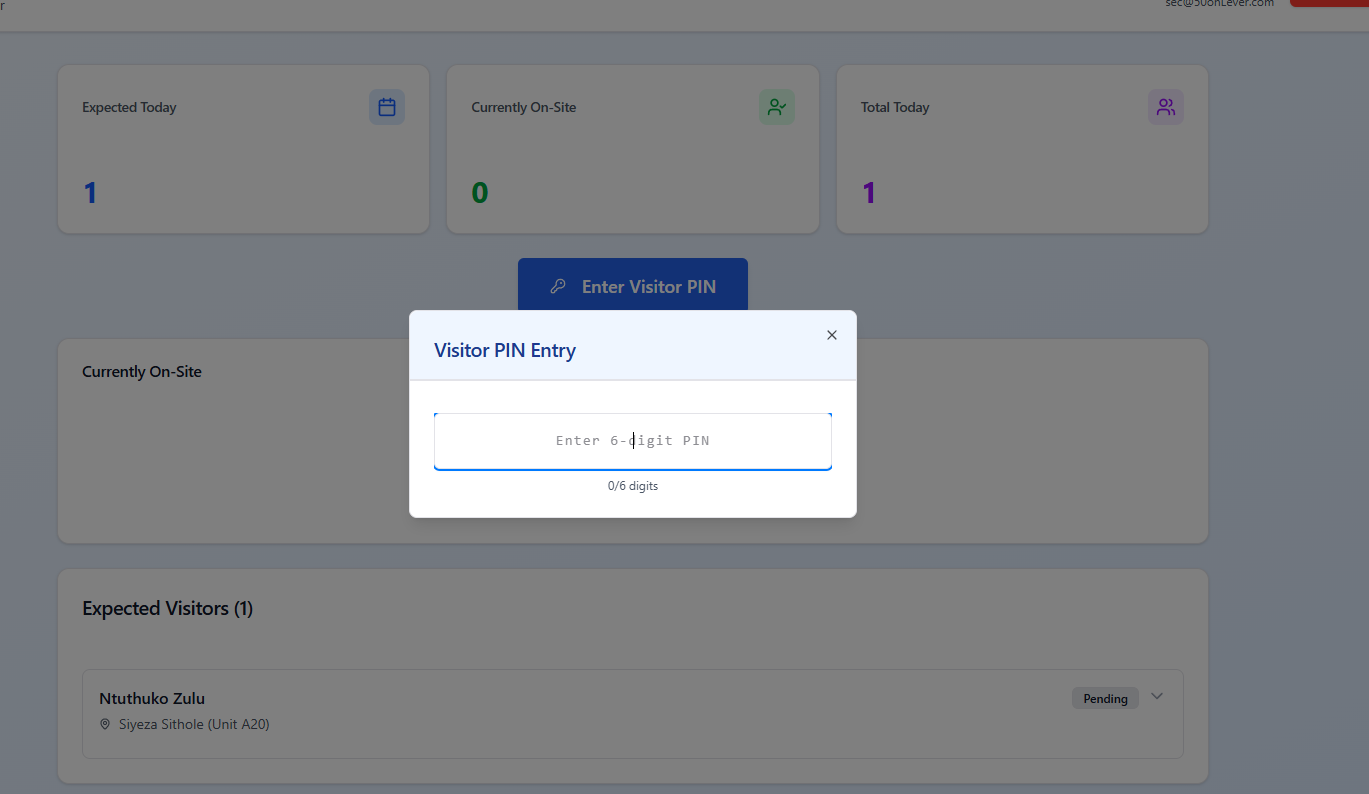
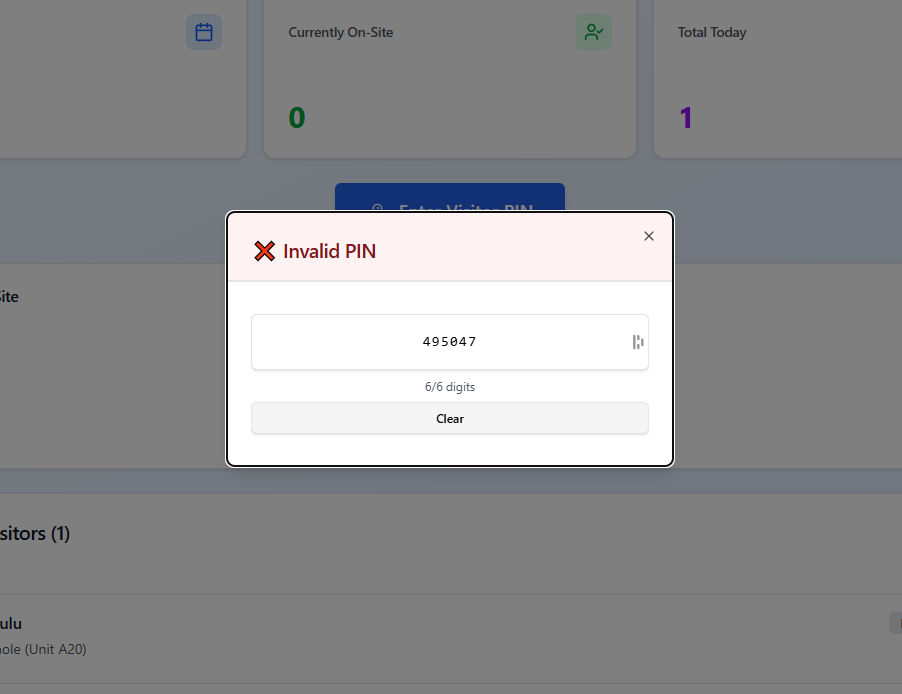
If the PIN is wrong or expired, you will see an Invalid PIN message. Clear and try again, or ask the resident to re-share the correct PIN.
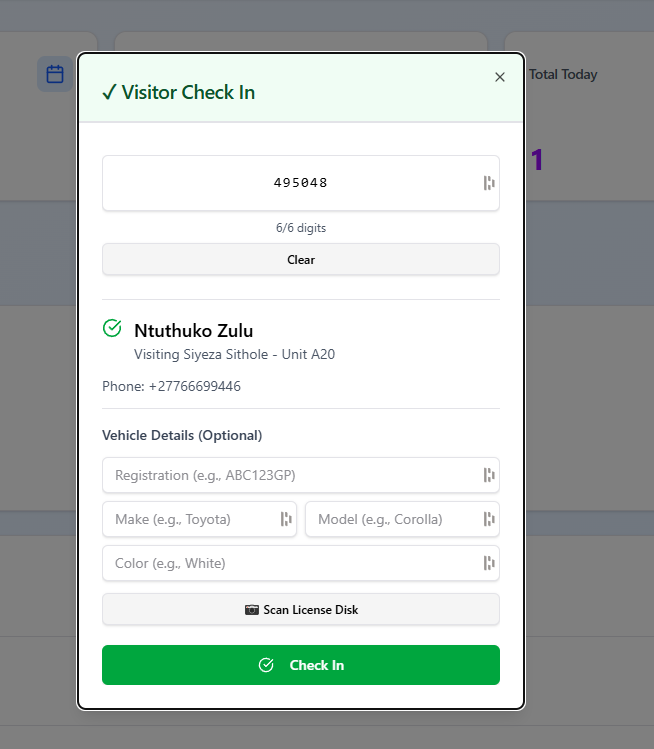
When the PIN is valid, visitor details appear automatically. You can optionally capture:
- Vehicle Registration
- Make, Model, Colour
- Or use Scan License Disk (OCR)
Then tap the green Check In button.
4. Visitors On-Site & Check-Out
After check-in, the visitor moves to the Currently On-Site list with a green “On-Site” badge and check-in time.
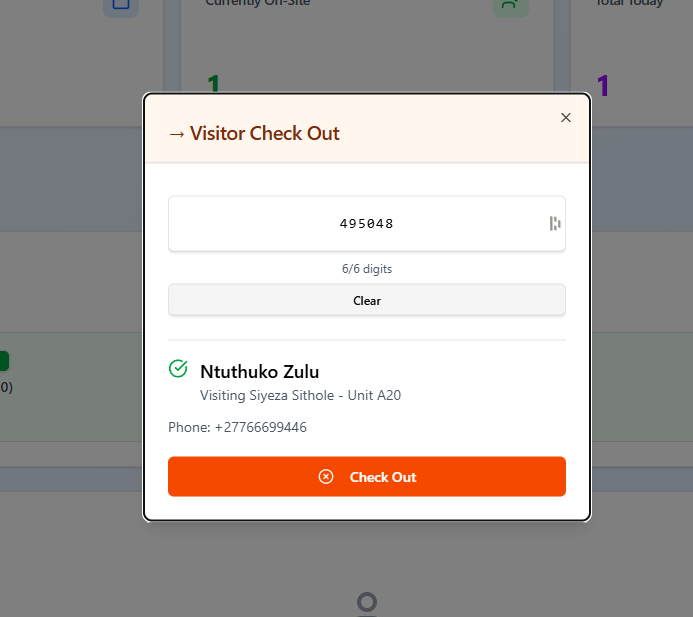
When the visitor leaves, enter the same PIN again (or select the visitor) and confirm Check Out.
Tips & Support
Best practices and help resources for smooth day-to-day use.
Best Practices
- Residents: Create the visit and share the PIN before the guest arrives. This avoids delays at the gate.
- Residents: Double-check the phone number so the visitor can be contacted if needed.
- Property Admins: Always copy the Security PIN immediately after creating a guard – it cannot be viewed again.
- Property Admins: Share invitation codes with residents via a secure channel (WhatsApp, SMS or email).
- Security: Encourage optional vehicle details for better audit trails, especially for high-security estates.
- Security: The app works offline – data will sync when connectivity returns.
- Everyone: PINs are single-use for the visit and expire after checkout or at the end of the day.
Common Questions
What if a resident loses their invitation code?
The Property Admin can regenerate a new invitation code from the Residents list and share it again.
What if a security guard forgets their PIN?
The Property Admin can reset the PIN from the Security Personnel edit screen and share the new credentials.
Does the visitor need to download an app?
No. The visitor only needs the 6-digit PIN. They show it (or read it out) at the gate.
Can one resident manage multiple properties?
Yes. Residents can link multiple properties and switch between them in the mobile app.
Is the system POPIA compliant?
Yes. Visita247 uses bank-level AES-256 encryption, hosts data in South Africa, and is designed for POPIA compliance.
Need Help?
For product or sales enquiries: sales@visita247.com
Website: visita247.com